Home » Arcade Cabinet DIY Guide – Build Yours Today
Arcade Cabinet DIY: Free Plans & Build Instructions
Arcade Cabinet DIY: free, easy-to-follow plans built on 40 years of arcade experience.
Arcade Cabinet DIY: Bring the Arcade Home With Your Own Hands

Arcade Cabinet DIY: Free Plans, Cut List & Instructions
Arcade cabinet DIY projects are easier than ever with this free guide. These plans and notes come straight from my workshop, tested over decades. They’re designed to help you avoid common mistakes and get your cabinet right the first time.
40 Years of Proven Arcade-Building Experience
With more than 40 years of experience designing and building arcade machines, I’ve learned which methods work best and which ones to avoid. Therefore, this guide includes only the proven techniques that save time and materials. In addition, every plan has been adjusted to balance compact size with authentic screen dimensions, aspect ratio, and button layout.
Everything You Need in One Place
Inside this free arcade cabinet DIY guide, you’ll find:
Printable blueprints for bartop and vertical cabinets
A complete cut list for panels and control layouts
Tools and materials recommendations
Step-by-step assembly and wiring instructions
Moreover, I’ve added extra tips and tricks to help you customize your machine, whether you want a compact one-player bartop or a full-size two-player cabinet. As a result, you’ll have everything you need to complete your build with confidence.
With a little patience and attention to detail, this is the kind of arcade magic you can create.

Compact Design With Authentic Feel
My goal with each arcade cabinet DIY plan was to make the cabinets as compact and lightweight as possible. This approach saves space in your home or game corner. However, it also preserves the authentic screen size, aspect ratio, and button layout of the original arcade machines.
Blueprints for Multiple Versions
In this guide, you’ll find detailed blueprints for different cabinet styles: two-player bartop machines, one-player mini bartops, and full vertical cabinets. As a result, you can choose the version that best fits your space and gaming style.
Tips, Tricks, and Material Choices
In addition, I’ve included expert tips and tricks gathered over decades of building. For example, you’ll see recommendations for alternative materials that work for collectors who want a mini replica, as well as builders who prefer stronger PVC or classic MDF. Moreover, each option comes with notes on durability, weight, and authenticity.
🗂️ Arcade Cabinet Variations
| Version | Players | Screen Size | Footprint | Best For |
|---|---|---|---|---|
| Bartop Arcade Cabinet | 2 | 17–19″ (5:4 ratio) | Medium | Retro feel for two players, great for living rooms or game corners |
| Mini Bartop Cabinet | 1 | 5–17″ LCD | Small | Collectors or portable setups; compact design with authentic controls |
| Vertical Cabinet | 1–2 | 19–21″ (rotated) | Tall & Slim | Classic vertical shooters, authentic upright arcade experience |
✨ Quick Tips
-
Bartop 2P → Best all-rounder for retro gaming sessions.
-
Mini 1P → Great for collectors and small spaces.
-
Vertical → Ideal for classic vertical (horizontal titles can be added in some occasions) shooters SHMUPS (Galaga, 1942, Donkey Kong).
Building Your Own Arcade Cabinet DIY Is Fun 🎮
Building Your Own Arcade Cabinet DIY Is Pure Fun
Building your own arcade cabinet DIY project is more than just a weekend hobby. It’s the perfect blend of creativity, nostalgia, and hands-on satisfaction. Above all, it gives you a chance to reconnect with the magic of retro gaming in a way modern consoles can’t match.
A Family-Friendly Project
If you have basic DIY skills and access to a few woodworking tools, you can get started right away. For example, many parents turn this into a bonding project with their children. As a result, the process becomes just as rewarding as the final arcade cabinet.
A Reward That Lasts for Years
Of course, the first power-on is exciting. However, the real reward comes later: years of unforgettable fun with friends and family gathered around your custom-built machine. In addition, this guide gives you everything you need — tools, materials, blueprints, and wiring tips — so you can avoid guesswork and focus on enjoying the journey.
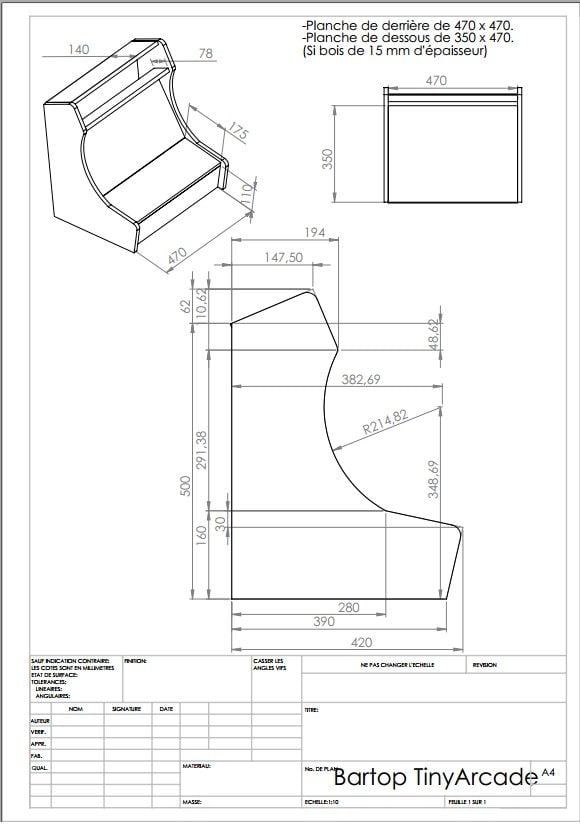
Check the side panel dimensions here. Of course you can adjust a little bit the shape as you like.
Time to Assemble Your Arcade Cabinet DIY 🛠️
Time to Assemble Your Arcade Cabinet DIY
Now comes the most exciting part: assembling your arcade cabinet DIY project. Take your time, follow the step-by-step instructions, and check the pictures carefully as you go.
Patience Pays Off
Always measure twice before cutting or screwing panels together. Otherwise, small mistakes can become frustrating and costly. However, with patience and careful attention to detail, the pieces will fit together smoothly.
Plans Tested Over Decades
This is not theory — these assembly methods come from nearly 40 years of designing and building arcade machines. In addition, I’ve included all the free plans, instructions, and drawings I’ve refined over the years. As a result, you can rely on proven designs that minimize errors and maximize durability.

🛠️ Step-by-Step Arcade Cabinet DIY Assembly
Follow these steps carefully. Take your time, measure twice, and keep your plans handy while you work.
Prepare All Panels
Cut all panels according to the blueprint or use pre-cut pieces if you have a kit.
Label each piece (A, B, C, etc.) to avoid confusion later.
Attach the Side Panels for the Arcade Cabinet DIY
Place the left and right side panels upright.
Use clamps to hold them steady before attaching cross panels.
Install the Base Panel
Secure the bottom panel between the two sides.
Use screws and wood glue for extra strength.
Add Cross Supports
Fit the internal cross panels (such as back brace, top brace, and monitor support).
Check alignment with a square tool before fastening.
Mount the Control Panel
Drill button and joystick holes (usually 28mm for most buttons..30mm for Sanwa).
Dry-fit controls before final installation.
Install the Monitor Bracket
Attach the mounting bracket or wooden supports.
Center the monitor and secure using its VESA mount.
Fit the Speaker Panel & Marquee
Drill speaker holes and mount the panel.
Prepare space for the marquee with LED or fluorescent backlight.
Add the Bezel & Plexiglass
Place plexiglass over the monitor opening.
Paint or mask edges black to hide gaps.
Wire the Controls & Electronics
Connect joysticks and buttons to the encoder.
Route wires neatly with zip ties.
Test all inputs before closing the cabinet.
Finish with Trim & Back Panel
Apply T-molding or edge trim using a router slot.
Add the back panel, porthole for ventilation, and optional lock.
Install LED strips or artwork as finishing touches.
⚡ Pro Builder Tips for the Arcade Cabinet DIY
Dry-fit everything before final fastening.
Sand edges smooth for a professional look.
Test electronics with the cabinet open — much easier to troubleshoot now.
Add felt pads or rubber feet to protect floors.


🛠️ Arcade Cabinet DIY – Assembly Instructions
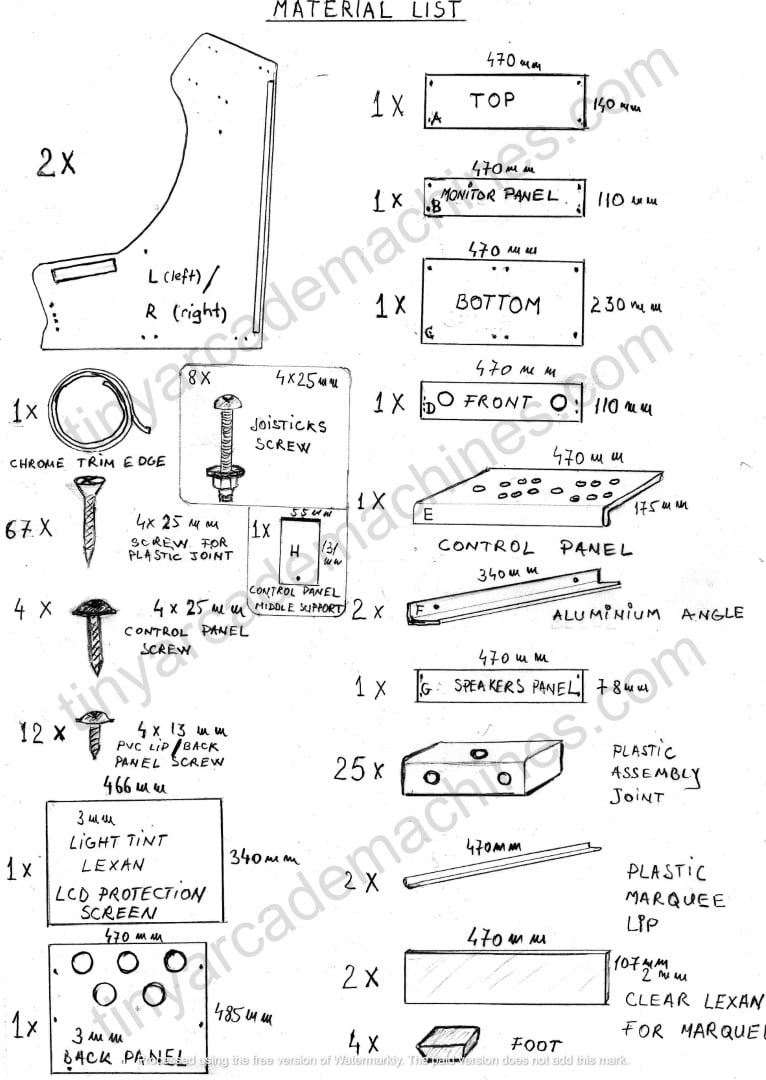
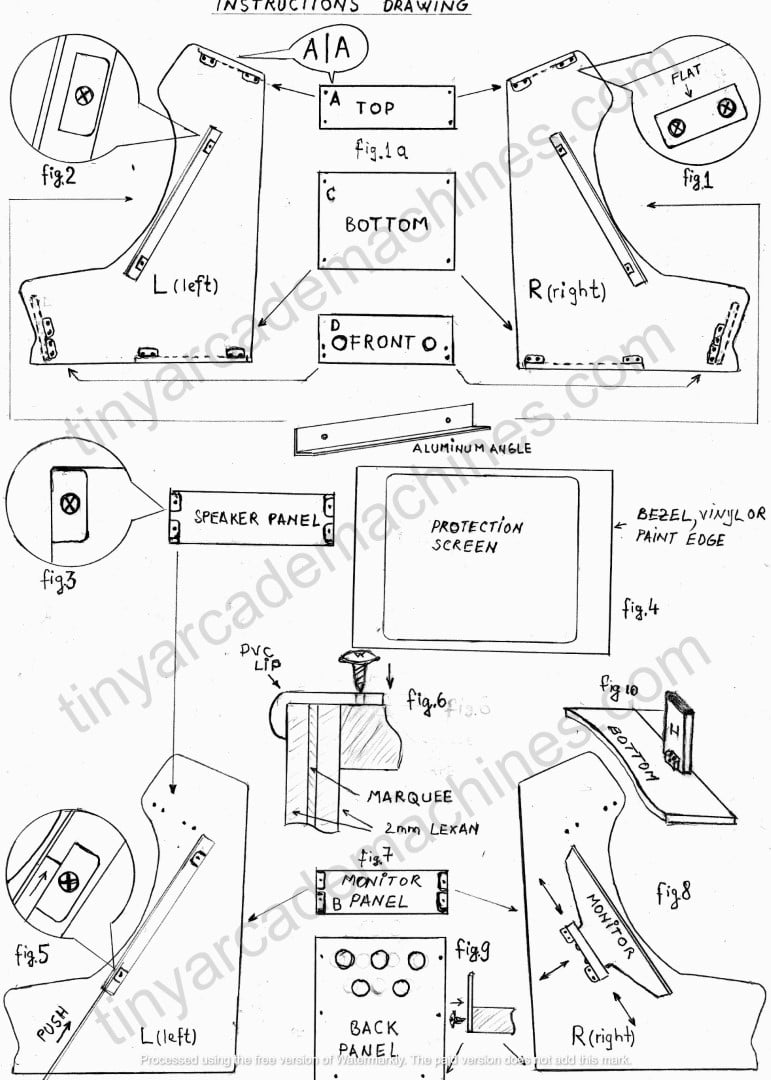
These are the original instructions and blueprints for the Two-Player Arcade Cabinet DIY Kit, first designed more than 25 years ago.
⚠️ Please read carefully before starting assembly .
Step-by-Step Assembly of the Arcade Cabinet DIY
Attach Plastic Joints
Screw the plastic joints onto the left (L) and right (R) side panels, following the small dot marks.
Do this for the top, bottom, and front panels only.
Ensure all joints are oriented with the flat surface facing outward.
Fit the Aluminum Angle (F)
Place the angle between L and R.
Use two plastic joints on each side to secure it.
Install Panels A, B, and C
One by one, fit panels A, B, and C into the L side panel.
Once aligned, attach the R side panel and screw them into place.
Add the Speaker Panel (G)
Screw four plastic joints into the marked positions on panel G.
If adding speakers, drill cutouts now according to their size.
Mount the speaker panel into the cabinet.
Fit the Control Panel
Attach with four 4x25mm flanged screws.
⚠️ Important: Do not leave gaps between the control panel and the L/R side panels. Tighten screws gently.
Install the Control Panel Middle Support
Secure as shown in Fig. 10.
Prepare the Protection Screen
Remove the protective foil.
Measure the visible size of your monitor screen, cover the center with masking tape, and paint the edges black.
Optional: apply self-adhesive vinyl or print a bezel design.
Place the painted side facing inward and slide it between the aluminum angle gaps at the bottom.
Tighten four screws to push the joints against the protection screen to hold it firmly.
Assemble the Marquee
Remove foil from the two 2mm Lexan sheets.
Place your custom or purchased marquee print between them.
If adding lighting (LEDs or neon), install it now.
Secure the marquee with six 4x13mm screws and PVC lips at the bottom and top edges.
Peel the tape from the PVC edges and press the marquee into place.
Install the Monitor
Screw four plastic joints into the monitor panel (B).
Attach the monitor to the panel using its rear VESA screw points (often hidden under plastic caps).
With help, lay the cabinet on its side, push the monitor against the protection screen, center it vertically, and screw the monitor panel into both L and R side panels.
Fit the Chrome Trim
Carefully peel the red foil from the trim.
Clean the cabinet edges.
Apply a thin layer of clear contact glue, let it sit 15 minutes, then press the trim firmly into place.
Leave edges slightly long and trim neatly with a sharp cutter.
Attach Cabinet Feet
Apply the self-adhesive feet to the bottom edges of the L and R sides.
Install the Back Panel
Secure with six 4x13mm screws.
This step locks everything in place and strengthens the cabinet.
💡 Notes & Tips
Controls not included: Choose quality buttons and joysticks (Sanwa, Seimitsu, or Happ). Buttons require 28mm holes.
Controller flexibility: Joysticks can be set for 2-way, 4-way, or 8-way play. Buttons can be changed from underneath without opening the whole machine. Drill control panel holes with a 4mm drill.
Speaker placement: Treble speakers should face forward. Bass speakers can point toward the back panel.
Extra strength: A hot glue gun can be used on panel edges for stronger bonding.
🚀 The Fun Part – Customize Your Build!
Now it’s time to bring your cabinet to life. Add the system that best fits your style:
💻 MAME Emulator on a PC
🥧 Raspberry Pi with RetroPie or Recalbox
🕹️ Pandora’s Box (JAMMA) multi-game boards
🎮 Modern consoles (PS3, Xbox 360, Wii)
🕰️ Classic consoles (Sega Mega Drive/Genesis, Nintendo 64, SNES, NES)
🎲 JAMMA Multi-Game boards (Arcade Classics 60-in-1, Blue Elf 2, etc.)
🎯 Why Choose an Arcade Cabinet DIY Project?
🎮 Relive the Golden Era of Gaming
Building an arcade cabinet DIY from scratch lets you bring back the excitement of the 80s and 90s — the golden age of video games. Enjoy the authentic arcade feel, right in your living room or game cave.
👨👩👧 The Arcade Cabinet DIY will give you Quality Time With Family
This is more than a woodworking challenge — it’s a chance to create lasting memories. Work side by side with your kids, teach them practical skills, and then enjoy retro gaming together on the cabinet you built.
🎨 Fully Customizable
A DIY arcade cabinet is as unique as you make it. Choose your favorite artwork, button layouts, screen size, and finish. From classic black T-molding to neon-lit edges, your machine can reflect your personal style.
✨ Whether you’re chasing nostalgia, building family connections, or creating a one-of-a-kind gaming setup, an arcade cabinet DIY project delivers it all.

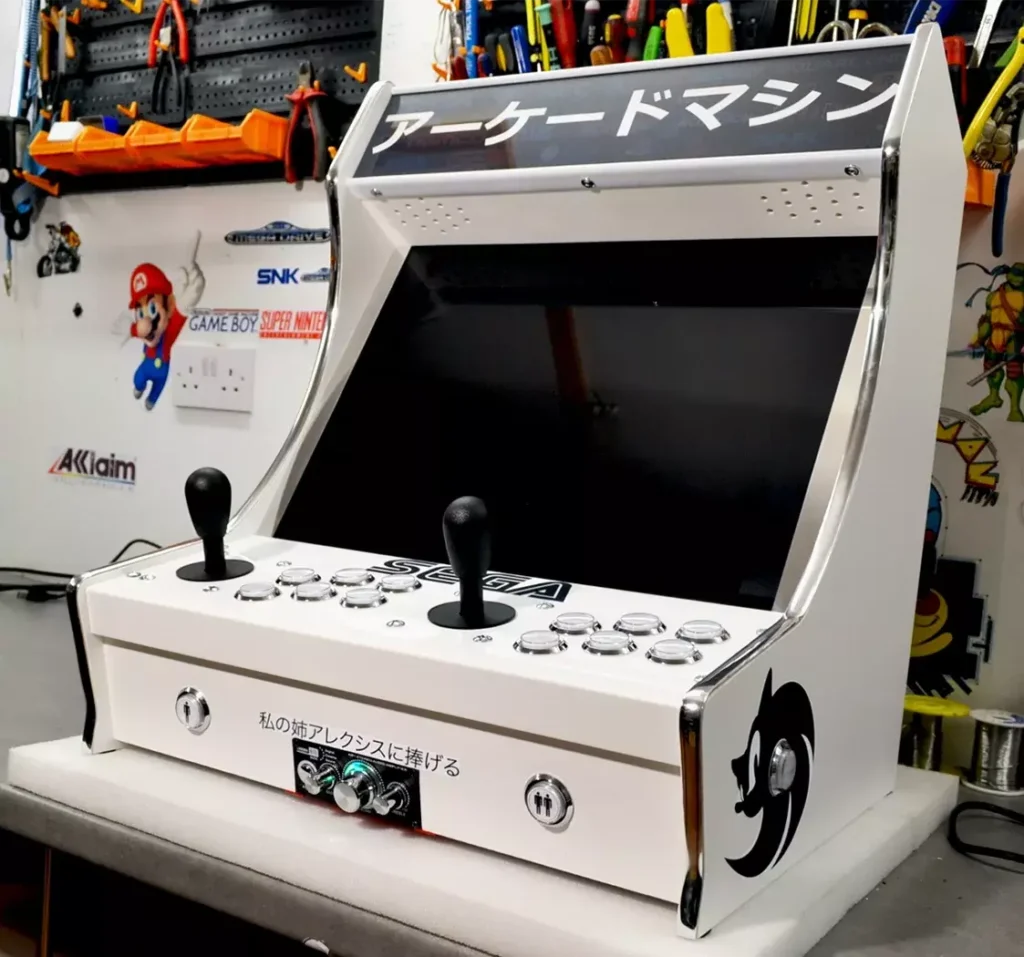
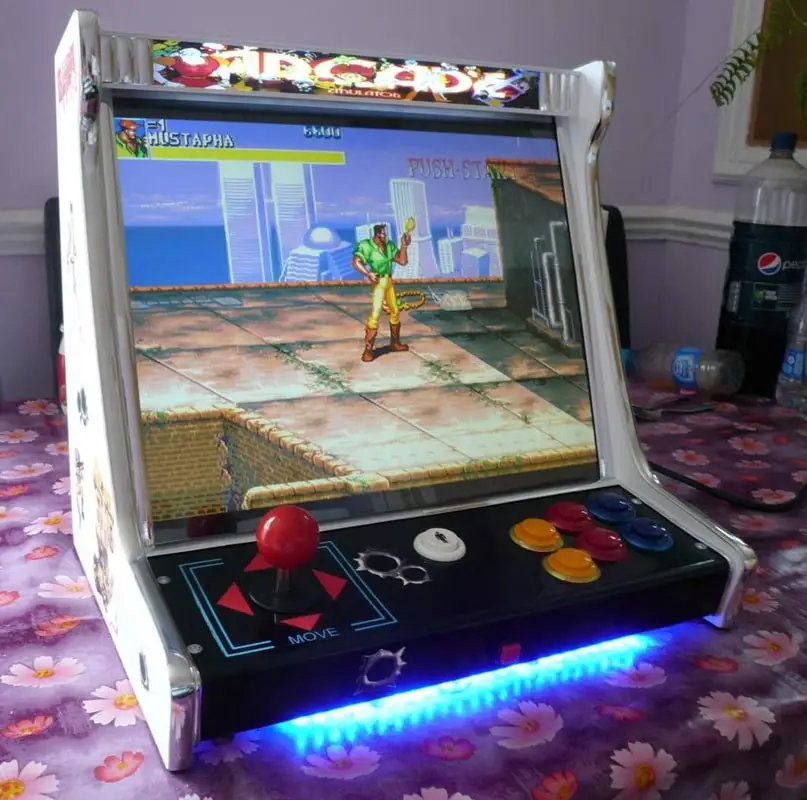
🎉 All Done! See the Fun in Action
Here’s how your arcade cabinet DIY project will look once everything is assembled and ready to play. The final result isn’t just a cabinet — it’s a piece of retro history you can enjoy for years to come.
My daughter and her friend absolutely love playing on it — proof that these machines bring joy across generations. 👨👩👧👦
Now it’s your turn. Check the free plans, grab your tools, and start building your own arcade cabinet today. The fun really begins once you press Start!

👨👩👧 More Happy Kids, More Happy Family
An arcade cabinet DIY project isn’t just about the build — it’s about the memories you create around it. Once it’s finished, the cabinet becomes a magnet for fun: kids laughing over their favorite retro games, parents sharing classics from their own childhood, and friends gathering for late-night battles.
Few DIY projects deliver this much joy to the whole family. It’s not just a machine — it’s a bonding experience that grows stronger every time you press “Start.”

🎮 Arcade Cabinet DIY Kit – One-Player Versions
Not every build needs to be two-player. If you want a compact design or you’re building a collector’s replica, the one-player arcade cabinet DIY kit is a perfect choice. These smaller builds save space while still giving you the authentic retro experience.
Below you’ll find the material lists for both the horizontal one-player bartop and the vertical one-player cabinet. Use these as a checklist before you start cutting or ordering parts.

Check below the assemble instructions for the one player cabinet

🪵 One-Player Horizontal Bartop – Materials Checklist
Ideal for small spaces or collector’s pieces, the horizontal 1P bartop preserves the classic arcade feel in a compact size.
-
🪚 Cabinet Body Panels – MDF (18mm) or PVC Foamalux (13mm, density 0.55–0.75 g/cm³, impact resistance ≥10).
-
🎮 Joystick & Buttons – 1× joystick (Sanwa/Seimitsu/Happ) + 6 action buttons + Start + Coin. (28mm holes).
-
🖥️ Monitor – 12″–15″ LCD, 4:3 or 5:4 aspect ratio for authentic look.
-
💻 Platform – Raspberry Pi, Pandora’s Box, or mini-PC.
-
🔊 Speakers – 2 small treble speakers facing forward.
-
✨ T-Molding / Edge Trim – 2–3 m of colored or chrome trim.
-
🪟 Plexiglass (3mm) – For screen protection.
-
🎨 Finish – Vinyl wrap or paint + optional custom artwork (side panels, marquee).
-
🔌 Electronics – Encoder board, wiring harness, power strip, and cables (HDMI/USB).
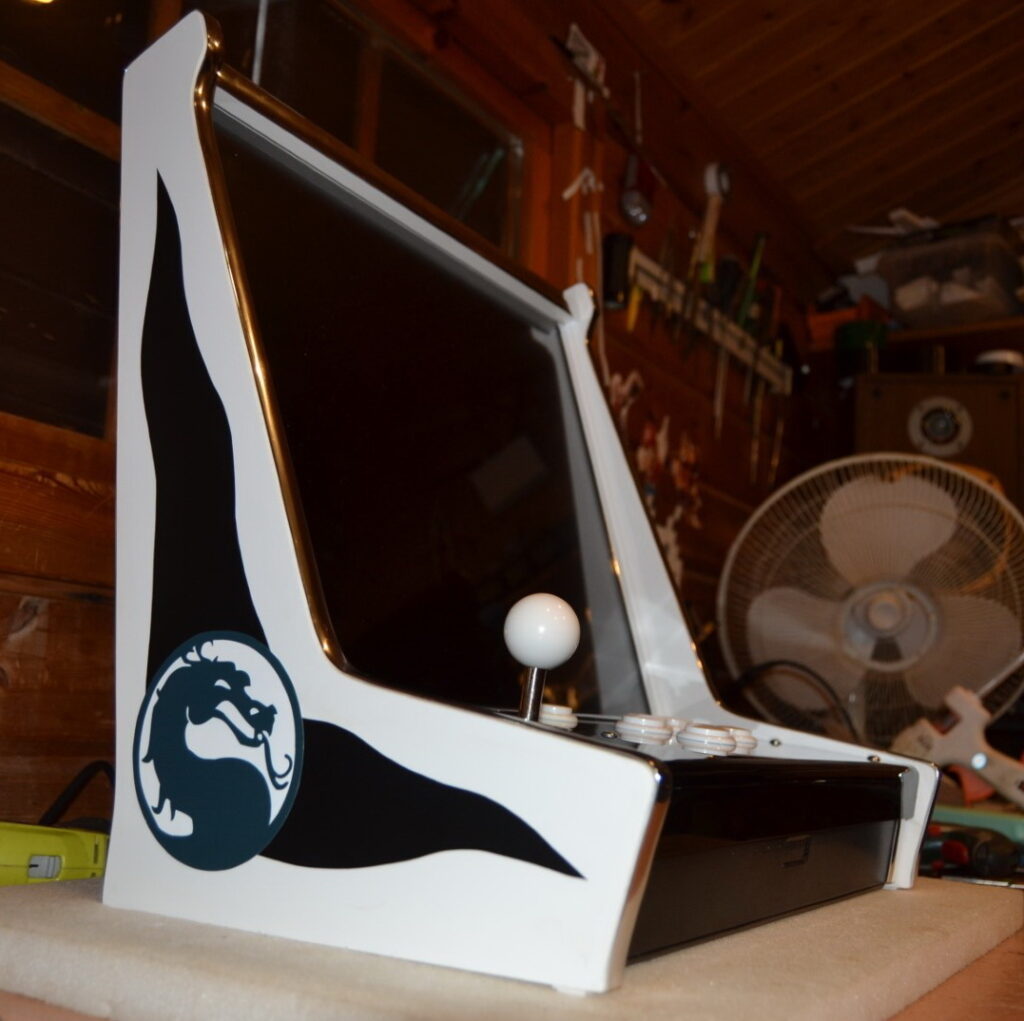
Her,s a picture of the one player vertical arcade cabinet DIY with all the materials ready to be assembled.

Check how the vertical version looks once assembled, now is time to add the electronics and to complete this project

🏆 One-Player Vertical Cabinet – Materials Checklist
Perfect for classic vertical shooters (Galaga, 1942, Donkey Kong). Slim, tall design that saves floor space.
-
🪚 Cabinet Body Panels – MDF (18mm) or PVC Foamalux (13mm, density 0.55–0.75 g/cm³).
-
🎮 Joystick & Buttons – 1× joystick + 3–4 action buttons + Start + Coin. (Fewer buttons since most vertical games need less input).
-
🖥️ Monitor – 17″–19″ LCD rotated vertically (portrait mode). VESA mount recommended.
-
💻 Platform – Pandora’s Box JAMMA board, Raspberry Pi, or PC with vertical MAME setup.
-
🔊 Speakers – 2–4″ speakers, optional subwoofer facing the back.
-
✨ T-Molding / Edge Trim – 4–5 m (more length required for tall sides).
-
🪟 Plexiglass (3mm–4mm) – Smoked plexi recommended to hide monitor edges.
-
🎨 Finish – Vertical-themed artwork (shmup graphics, starfields, neon designs).
-
🔌 Electronics – Encoder, wiring, power supply, LED lighting for marquee (optional).
💡 Pro Builder Tips
-
For horizontal cabinets, prioritize comfort — a slightly angled screen makes gameplay easier on the eyes.
-
For vertical cabinets, double-check your monitor’s rotation settings before mounting — not all LCDs look good in portrait mode.
-
Always test-fit controls on cardboard or MDF scrap before drilling into the final panel.
..
and how it might look like in the end:

Here’s the horizontal version of the cabinet but if you don’t know if you need a vertical or horizontal cabinet here’s the comparison table:
📊 One-Player Arcade Cabinet DIY – Horizontal vs. Vertical
| Feature | Horizontal Bartop (1P) | Vertical Cabinet (1P) |
|---|---|---|
| Footprint | Compact, sits on a desk or counter | Tall, slim, freestanding |
| Screen Size | 12″–15″ LCD, 4:3 or 5:4 aspect ratio | 17″–19″ LCD, rotated vertically (portrait) |
| Best For | Casual play, collectors, small spaces | Classic vertical shooters (Galaga, 1942, Donkey Kong) |
| Controls | 1 joystick + 6 action buttons + Start/Coin | 1 joystick + 3–4 action buttons + Start/Coin |
| Platform Options | Raspberry Pi, Pandora’s Box, mini-PC | Pandora’s Box, Raspberry Pi, or PC with vertical MAME setup |
| Speakers | 2 small treble speakers facing forward | 2 small treble speakers (optional rear subwoofer) |
| Trim & Finish | 2–3 m T-molding or edge trim | 4–5 m T-molding or edge trim |
| Look & Style | Compact, arcade-in-a-box feel | Authentic tall cabinet, retro arcade look |
💡 Quick Takeaway
-
Pick the Horizontal Bartop if you want something portable and space-saving.
-
Pick the Vertical Cabinet if you want the authentic upright arcade experience and plan to play classic shooters.

…and how it looks once completed
🧰 Materials Checklist for the Arcade Cabinet DIY
Depending on your design, the exact materials may vary. Below is a comprehensive list with tips to help you choose the best options for durability, aesthetics, and authentic arcade feel.
🪚 Cabinet Body Materials
MDF Sheets (18mm) – Affordable, rigid, and widely available. Easy to cut but heavy. Always seal edges with primer before painting to prevent moisture absorption.
Plywood Sheets – Lighter than MDF and holds screws better. Requires more sanding for a smooth finish.
PVC Rigid Foam Board (Foamalux 13mm) – Premium choice for a long-lasting cabinet. Not the cheapest, but absolutely worth it if you’re serious about quality. Look for:
Density: 0.55–0.75 g/cm³
Impact Resistance (Charpy ISO 179-1/1eU): ≥10
These specs guarantee strength and durability. Bonus: lighter weight and moisture resistance.
🎮 Controls & Interfaces
Arcade Buttons & Joysticks – Choose reliable brands: Sanwa, Seimitsu, or Happ. Precision controls are essential for authentic gameplay.
Player Setup – Standard: 6 action buttons per player + Start & Coin buttons.
💡 Pro Tip: Add an extra admin button for hotkeys (exit game, save/load state).
🖥️ Display
Monitor or LCD Screen – Best choice: 19–21″, 5:4 aspect ratio to match original arcade proportions.
Ensure the monitor has a VESA mount for easier installation.
Matte screens help reduce glare from marquee lighting.
🕹️ Game Platforms
Pandora’s Box (JAMMA) – Plug-and-play, comes preloaded with classic games.
Raspberry Pi (RetroPie / Recalbox) – Flexible and customizable; perfect for tinkerers.
PC – Most powerful and scalable option, supports modern emulators and high-res displays.
✨ Finishing Materials
T-Molding – Classic arcade edge trim. Install using a router slot-cutting bit. Available in multiple colors.
Neon LED / LED Strips – Adds a modern glow along edges or marquee. Use adhesive-backed strips for easy mounting.
Plexiglass (≥3mm) – Protects the monitor and artwork. Clear plexi for visibility, smoked plexi for hiding monitor edges.
Vinyl Wrap or Paint – Vinyl = fast, easy customization. Paint = traditional finish with more prep and sanding.
🖼️ Decorative Elements (Optional)
Custom Artwork Prints – For side panels, marquee, and control panel overlays. Use high-resolution vinyl with laminate for durability.
Chrome Trim or Metal Accents – Adds a premium finish around bezels and edges.
💡 Pro Tips for Materials
Always buy an extra sheet of your main material — mistakes are common, and spares save time.
If using MDF, prime and sand edges twice before painting to prevent fuzzy, uneven surfaces.
Test button layouts on cardboard before drilling the actual control panel.
Use smoked plexiglass to hide monitor bezels and achieve a cleaner look.
Apply vinyl artwork with spray adhesive to prevent bubbling.
🕹️ Getting Started With Your Arcade Cabinet DIY Build
Before cutting or assembling panels, make sure you have the right tools. The proper setup not only speeds up your build but also ensures accuracy and safety. This section covers the essential woodworking tools you’ll need before moving on to materials and electronics.
🔧 Woodworking Tools
📏 Basic Tools
-
Measuring Tape – Accuracy matters. Use a tape with both metric and imperial units to avoid conversion errors.
-
Pencil & Square – For marking straight lines and 90° corners. A carpenter’s square is especially useful for monitor openings and control layouts.
-
Clamps – Keep panels firmly in place while gluing or screwing. Have several sizes on hand.
🪚 Cutting Tools
-
Jigsaw – Best for curves, control panel cutouts, and speaker holes. Use fine-tooth blades on MDF or PVC for cleaner edges.
-
Circular Saw / Table Saw – Handles long, straight cuts for sides and base panels. Pair with a straight-edge guide for precision.
-
Hole Saw / Spade Bits – Needed for joystick and button cutouts. Arcade buttons are usually 28mm, so pick the right size for a snug fit.
🔩 Assembly Tools
-
Power Drill/Driver – For pilot holes and fastening screws. Keep drill and driver bits handy to save time.
-
Wood Glue – Reinforce joints before screwing for a stronger build.
-
Screws – Countersunk wood screws create a flush, professional finish.
-
Sander / Sandpaper – Smooth edges and prep surfaces for painting or vinyl.
⚡ Pro Prep Tips
-
Keep a shop vacuum nearby — MDF dust spreads quickly.
-
Label each cut panel (A, B, C, etc.) to match your blueprints.
-
For cleaner jigsaw cuts, apply masking tape along the cut line.
-
Don’t skip safety gear: goggles, ear protection, and a dust mask.

⚡ Electrical & Electronics Tools for the Arcade Cabinet DIY
These tools cover everything for wiring buttons, joysticks, the power supply, and the control system. Accuracy and safety are key here — take your time and double-check connections.
🔥 Soldering Iron
-
For soldering button microswitches or making custom harnesses.
-
Use a fine-point tip with 60/40 rosin-core solder for small arcade parts.
-
Keep a solder sucker or wick nearby for quick fixes.
✂️ Wire Stripper & Cutter
-
Strips insulation and cuts wires to length cleanly.
-
Choose one that handles common arcade gauges (18–22 AWG).
-
Pre-cut and label wires before wiring to stay organized.
🔧 Screwdrivers
-
Flathead and Phillips for installing buttons, joysticks, and encoders.
-
A small precision set helps with encoder terminals or Raspberry Pi screws.
📟 Multimeter
-
Optional but invaluable for checking continuity, voltage, and grounding.
-
Saves hours of troubleshooting when controls don’t respond.
🖥️ Computer & Display Tools
The display and software setup are the core of your arcade cabinet DIY project. These tools help you mount the monitor and configure your platform (PC, Raspberry Pi, or Pandora).
🖼️ Monitor Mounting Bracket
-
Holds the display securely inside the cabinet.
-
Match it with your monitor’s VESA pattern for easy fitting.
🔌 HDMI / VGA Cables
-
Connect the display to your platform.
-
Keep a spare cable — cheap ones often fail over time.
-
For Raspberry Pi, HDMI is the most reliable choice.
⌨️ Keyboard & Mouse
-
Essential for initial software setup (especially with Pi or PC).
-
Store them away after configuration.
🎨 Optional Installation Tools
For those who want a more professional finish.
🌀 Router Tool
-
Used to cut recessed channels for T-molding.
-
Standard slot-cutting bit: ⅛ inch (3mm).
✋ T-Molding Installation Tools
-
A rubber mallet or roller helps seat T-molding evenly.
-
Warm it with a heat gun to bend tight corners.
💡 LED / Neon Installation
-
For cabinet edge lighting or marquee backlight.
-
Position strips evenly and secure with adhesive backing.
⚡ Pro Tips for Wiring & Electronics
-
Label both ends of every wire before closing the cabinet.
-
Use zip ties or cable clips for clean wiring and better airflow.
-
Separate LED power from the main board to prevent interference.
-
Test all controls and connections before mounting the back panel.


🔌 Extra Resources: Arcade Cabinet Wiring
While this free arcade cabinet DIY guide covers the essentials, there are many encoders and hardware inputs that you may want to consider for your cabinet.
If you want to dive deeper into wiring diagrams and community-tested solutions. Here are two valuable resources worth checking out:
🛠️ ArcadeControls Forum Wiring Guide – a long-running community thread packed with diagrams, tips, and troubleshooting advice from builders worldwide.
📚 Retro Active Arcade Wiring Diagrams – a collection of visual diagrams and video tutorials, useful for encoder setups and button layouts.
- Feel free to Contact us if you don’t know what encoder is the most suitable for your project, and will help you with free advice.
📐 Free Drawings, Plans, and Tips From 40 Years of Experience
✅ Proven Designs You Can Trust
With nearly four decades of arcade-building experience, I’ve refined my designs into a collection of easy-to-follow arcade cabinet DIY plans. These are the exact blueprints I’ve used to build dozens of cabinets that balance durability, authentic gameplay, and ease of assembly.
📂 What’s Included
-
Accurate panel dimensions for multiple cabinet styles.
-
Authentic button layouts based on classic arcade machines.
-
Step-by-step assembly drawings that simplify the build process.
-
Extra tips from real builds to make your project smoother.
💡 Builder’s Insights
-
Ask your local hardware store to pre-cut panels — it saves hours of work at home.
-
Add hinges to the back panel for quick access to wiring and electronics.
-
Dry-fit your cabinet before final assembly to confirm everything aligns properly.
These plans and notes come straight from my workshop, tested over decades. They’re designed to help you avoid common mistakes and get your cabinet right the first time.

🎯 The End Result: Endless Hours of Retro Fun
Building your own arcade cabinet DIY isn’t just a weekend project — it’s a lasting investment in entertainment.
Once finished, your custom cabinet becomes a gateway to hundreds (or even thousands) of classic games. From Pac-Man to Street Fighter, your build puts decades of arcade history at your fingertips.
Best of all, the cabinet stands as a permanent showcase piece — a blend of craftsmanship and nostalgia that will keep delivering joy for years to come.


🏁 Final Thoughts: You Can Do This
With a bit of time, patience, and the right guidance, anyone with basic DIY skills can complete an arcade cabinet DIY build. Whether it’s your very first project or your fifth, the satisfaction of pressing “Power” on a machine you built with your own hands is truly unmatched.
So grab your tools, maybe involve your kids for the fun of it, and start building. And when you’re ready for more inspiration, explore our blog for free plans, tips, and retro gaming guides that will keep your arcade journey going.
🎉 Final Words
This is a challenge — but it’s also incredible fun.
Take your time, follow the steps, and soon you’ll have a custom arcade cabinet that delivers years of retro gaming enjoyment.
Good luck, and thank you for keeping the arcade spirit alive!
Arcade Cabinet DIY FAQ
❓ What size monitor should I use for an arcade cabinet DIY build?
For the most authentic retro look, use a 19–21” LCD with a 5:4 aspect ratio. If building a vertical cabinet, rotate the monitor into portrait mode for classic shooters like Galaga or Donkey Kong.
❓ MDF vs. PVC foam board: which is better for an arcade cabinet DIY?
MDF (18mm): Affordable, rigid, and widely available but heavy.
PVC foam board (Foamalux 13mm): Premium option — lighter, moisture-resistant, and more durable. If you want a long-lasting build, PVC is the best choice.
❓ Can I use a Raspberry Pi instead of a PC or Pandora’s Box for my arcade cabinet DIY?
Yes! A Raspberry Pi with RetroPie or Recalbox is a flexible and popular choice. It’s cost-effective, supports thousands of games, and is easy to configure for beginners.
❓ Do I need to solder the buttons and joysticks in an arcade cabinet DIY build?
Not always. Many modern encoder boards (like the I-PAC2 or zero-delay USB encoders) use quick-connect terminals. Soldering is only required if you want a fully custom harness.
❓ How much does it cost to build an arcade cabinet DIY?
On average, expect to spend €180–€450 ($200–$500). Of course this depends of what hardware you want to fit inside.
Here the big difference will make especially the PC but also the joysticks, buttons and the encoder. Genuine Sanwa arcade joystick and buttons and the I-pac 2 encoder will dictate the final quality of the cabinet but also the price.
For the high demanding emulators, a powerful PC can cost a lot more. Here’s a simple breakdown:
Cabinet material (MDF or PVC board): €50–€120
Controls (joysticks, buttons, encoder): €40–€130
Monitor (19–21” LCD): €60–€120
System (Raspberry Pi or Pandora’s Box): €40–€110.
For the PC, the cost will depends on how powerful you want it to be (especially the processor, memory, video card and the storage size.
Finishing (vinyl, paint, T-molding, plexiglass, artwork): €30–€80
