Arcade Cabinet DIY Kit: Build Your Own Retro Gaming Machine at Home
Bring the Arcade Home With Your Own Hands
I have designed and built many Arcade Cabinet DIY Kits in almost 40 years of building arcades.
Feel free to use all the FREE PLANS, instructions and drawings I put together over the years.
My goal was to build the cabinets as compact and light as possible in order to save space and, at the same time, to keep the size of the screen, the aspect ratio, and the button layout just as in the original arcade cabinets.
You will find below the blueprint ( for the two player bartop arcade machine and one player mini arcade bartop, also for the vertical arcade cabinet).
You will also find tips & tricks, and different materials you can use for different types of arcade cabinets.
Building your own Arcade Cabinet DIY is FUN
Building your own arcade cabinet DIY is the perfect blend of creativity, nostalgia, and DIY satisfaction.
So if you have some basic DIY skills and some wood-cutting tools, grab your child and create a fun bonding project.
I guarantee, if you do this, you will enjoy the retro video games as never before.. It is not only a challenge to do it, but it will reward you with years of incredible FUN.
In this ( let’s name it guide), I’l show everything you need to know — from tools and materials to tips, drawings, and tricks — to help you get started on your custom arcade journey.
Time to assemble the Arcade Cabinet DIY
Now is time to assemble the cabinet, check the pics below and read the step by step instructions.
Do not rush and measure twice before assemble
I have designed and built many Arcade Cabinet DIY Kits in almost 40 years of building arcades.
Feel free to use all the FREE PLANS, instructions and drawings I put together over the years.
Arcade Cabinet DIY assembling instructions
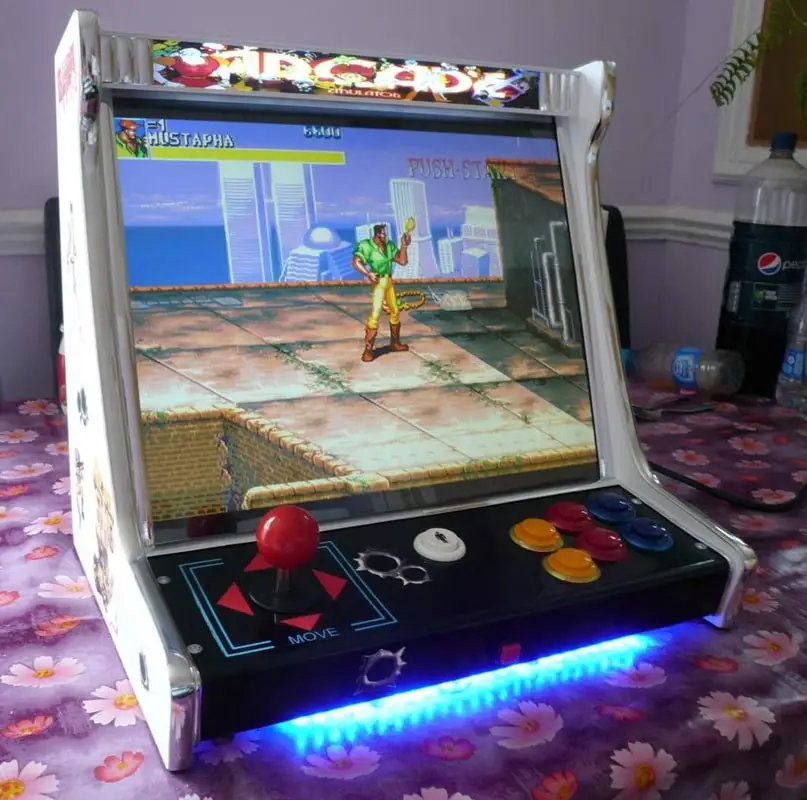
In this section you will find the original Instructions and blueprint for the Two Player Arcade Cabinet DIY Kit I put together about 25 years ago.
ASSEMBLING INSTRUCTIONS:
PLEASE READ THEM CAREFULLY BEFORE ASSEMBLING THE CABINET
-
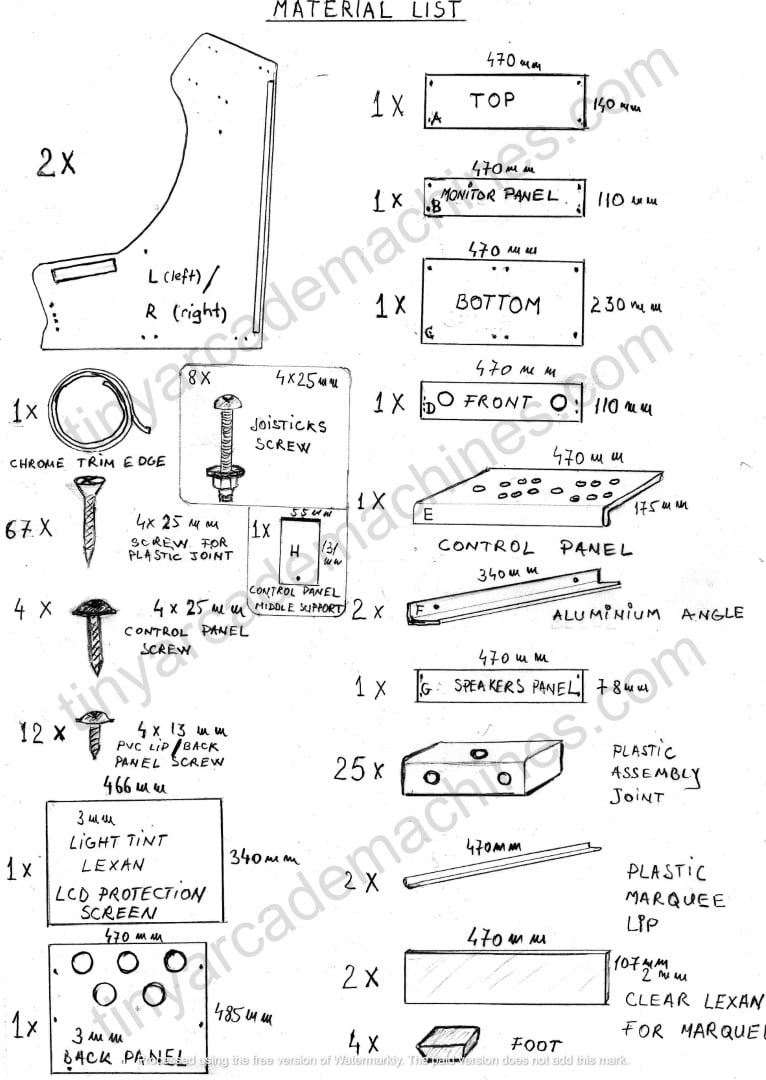
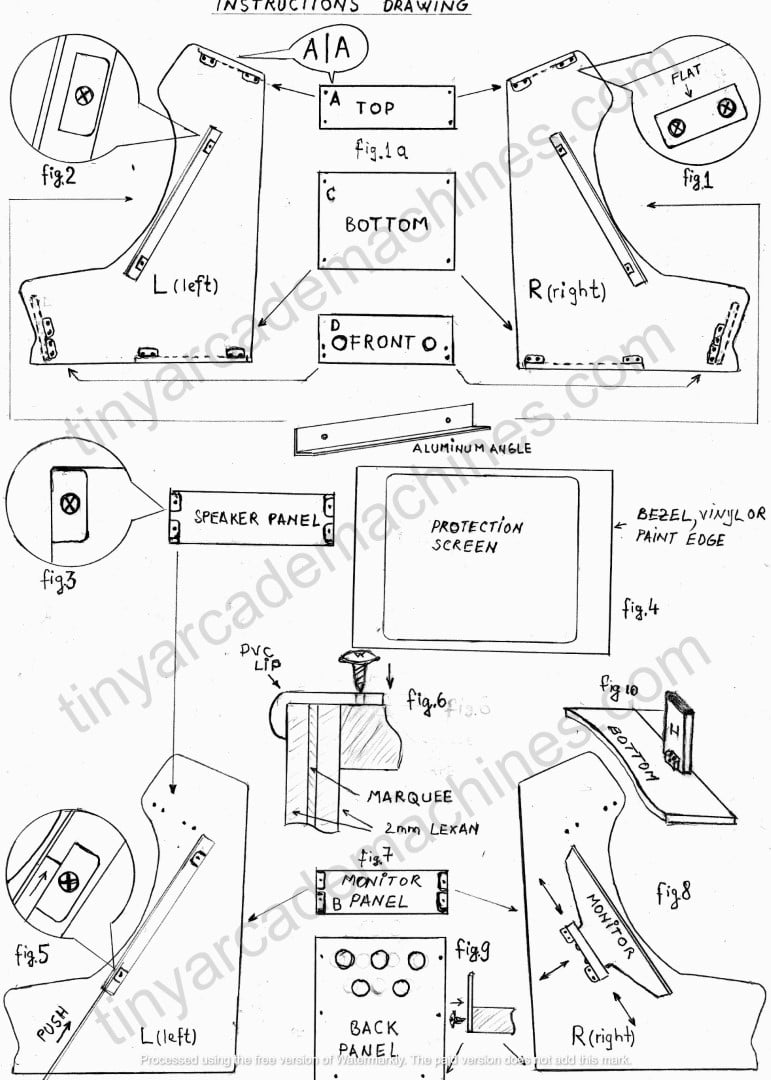
Screw the plastic joints on L(left) and R(right) side (fig 1), into the small dot marks for TOP, BOTTOM and FRONT panels ONLY. All the plastic joints have to be orientated with the flat surface outside (fig 1 )
-
Fit the ALUMINUM ANGLE (F) with two plastic joint on both L and R (fig 2)
-
Now you are ready to assemble the Arcade Cabinet DIY. Fit the A,B and C panel ,one by one (fig.1a),and screw all them on the L(left) side. After that complete with the R(right) side.
-
Screw four plastic joints into the small dot marks of the SPEAKERS panel (G) panel(fig 3) and if you decide to fit the speakers here,now you can drill this panel to the shape and size of your speakers. Now assemble the SPEAKERS panel (G) to the cabinet.
-
Fit the CONTROL PANEL with four 4X25mm flanged screws – Very important: DO NOT leave gaps between the CONTROL PANEL and the L(left) and R (right) side. Now tighten them gently.
-
Fit the Control Panel Middle Support(fig.10)
-
Take off the protection foil from the PROTECTION SCREEN, measure the visible size of your monitor screen, cover the middle with masking tape and paint the edge(fig 4). You can also use self adhesive vinyl or print your favorite game Bezel. Make sure the painted side of the Arcade Cabinet DIY is orientated to the inside of the cabinet, and push it between the gaps from the ALUMINUM ANGLE, from the bottom of the cabinet(fig 5 )
-
Now tighten the 4 screw by pushing the plastic joint against the Protection screen ,to avoid the movement of this.
7. Take off the protection foil from the two LEXAN 2mm, print your own or buy your desire MARQUEE, place it in between as show in (fig 6 ). If you decide to light the MARQUEE you can do it now ,by placing LED,s or a Neon inside. Now use 6 short screws 4X13 and fit the bottom of the MARQUE on to the cabinet with the PVC lip. Then the top side(fig,6).
8. Both PVC edges have a double side tape attached. Peel the protection and fit the marquee (fig 6)
9. Fit the monitor inside the cabinet. My advice is to ask somebody to help you at this point. Start with screwing four plastic joints into the MONITOR PANEL (B) (fig 7 ). There are many types of monitorsyou can use on your Arcade Cabinet DIY but most have four screws in the back. Sometimes the threads of the screws are hiding under a plastic cap. Use them to attached the MONITOR to the MONITOR PANEL , and be sure this is in the middle. Now lie down the cabinet on one side(L or R), push the monitor against the monitor PROTECTION SCREEN, center the monitor(up and down this time) and screw the MONITOR PANEL into both L and R side (fig 8)
11) Gently peel the red protection foil of the Chrome Trim. Make sure the edges from L and R are clean. Use a small amount of clear contact glue ,leave it for 15 minutes
than press gently by keeping all the time the CHROME Trim in the center. Leave the edge a little bit longer and cut it straight with a sharp cutter.
12) Fit the self adhesive foot on the edge of the L and R side.
13) The last operation is to assemble the back panel ( fig 9) with six screws 4X13mm.You will notice as a result a much strengthened and strong cabinet.
NOTES AND TIPS:
***The joysticks and the buttons are not provided in this kit as there are so many types, shapes and prices you can chose from the market. Make sure you buy buttons for 28mm holes.
***This kit has a “open source” regarding the controllers. This means you can adjust the joysticks for 2, 4 or 8 way or to fit/change the buttons from underneath of the machine without open it. To fit the joysticks you will use the 8 screws 4x25mm that are included in the kit and drill the CONTROL PANEL with a 4mm drill. There is no set time when you have to fit the joysticks and buttons but I recommended to do this step before the monitor is attached to the cabinet.
***You don’t need a Speakers Panel full of holes. Only the small treble speakers are indicated to be orientated towards you .The Bass speakers can be orientated towards the back panel.
***For extra strength of the Arcade Cabinet DIY it is acceptable to use a Glue gun hot glue on the edge before assembling the parts together.
NOW IT IS THE MOMENT TO FREE YOUR IMAGINATION
Let’s put in….
– COMPUTERS WITH THE INCREDIBLE MAME EMULATOR,
– Raspberry-Pi with RETROPIE or RECALBOX
– JAMMA Pandora’s boxes
– NEW CONSOLE SYSTEMS LIKE PS3,XBOX 360 ,OR WII,
– OLD CONSOLE LIKE SEGA Megadrive /Genesis , NINTENDO 64,Super NINTENDO,NES…..
– JAMMA MULTY GAMES like the Arcade Classic 60 in 1 or the Blue Elf 2
THIS IS A CHALANGE , THIS IS FUN……GOOD LUCK and THANK YOU!
Why Choose an Arcade Cabinet DIY Project?
Relive the Golden Era of Gaming
Building an arcade cabinet DIY from scratch allows you to relive the excitement of the 80s and 90s — the golden age of video games — right from your living room or game cave.
Quality Time With Family
This is more than just a woodworking project. It’s a great opportunity to bond with your kids, pass on some hands-on skills, and share the joy of retro gaming.
Fully Customizable
One of the biggest perks of going the **DIY arcade cabinet** route is customization. Choose your favorite game themes, screen sizes, buttons, and finishes to make a machine that’s uniquely yours.
All done!… check how it will look once you complete it.
My daughter and her friend enjoy it so much.
Arcade Cabinet DIY Kit- One Player Versiones
Check the Arcade Cabinet DIY Kit One Player material list you will need for the horizontal and vertical machine.
Check below the assemble instructions for the one player cabinet
Her,s a picture of the one player vertical arcade cabinet DIY with all the materials ready to be assembled.
Getting Started With Your Arcade Cabinet DIY Build
Tools You’ll Need:
Woodworking Tools
For building the arcade cabinet DIY frame and structure:
Basic Tools:
Measuring tape – Accurate measurements are critical.
Pencil and square – For marking straight lines and corners.
Clamps – To hold pieces in place while gluing or screwing.
Cutting Tools:
Jigsaw – Ideal for cutting curves and control panel shapes.
Circular saw or table saw – For long, straight cuts.
Hole saw or spade bits – For joystick and button holes.
Assembly Tools:
Power drill/driver – For drilling holes and driving screws.
Wood glue – For stronger joins alongside screws.
Screws/nails – For fastening panels securely.
Sandpaper or electric sander – For smoothing edges and surfaces.
Electrical & Electronics Tools for the Arcade Cabinet DIY
To wire buttons, joystick, power, and connect the control system:
Soldering iron – If soldering buttons or custom wiring.
Wire stripper and cutter – For preparing wires.
Screwdrivers – For installing buttons, joystick, etc.
Multimeter – To test connections (optional but useful).
🖥️ Computer & Display Tools
To handle software setup and integration of screen and controls:
Monitor or LCD mounting bracket – To install the display.
HDMI/VGA cables – To connect your screen to a PC , Raspberry Pi or Pandora Box
Keyboard and mouse – For initial software setup.
🎮 Optional Tools & Materials
Router tool – For recessed T-molding edges.
T-molding installation tools – If adding arcade-style edging.
Or Neon LED on the edge if wanted ( pics below with a green edge added).
Paint or vinyl wrap – For finishing and customization.
Artwork printing supplies – If you’re adding side art/marquees on the arcade cabinet DIY..
Materials Checklist for the arcade cabinet DIY
Depending on the design you choose, your materials may vary. Here’s a basic list:
- MDF or plywood sheets (for the cabinet body). I recommend Plywood as it is stronger and lighter compared with MDF.
- Control buttons and joystick (go with good quality Sanwa, Seimitsu or Happ) as accuracy is important in this video games.
- Monitor or LCD screen ( use 5:4 format to keep the original aspect ratio of the arcade retro games).
- Pandora’s Boxes JAMMA, Raspberry Pi or PC for running games
- T-molding for edges or Neon LED
- Plexiglass for screen cover (minim 3mm thickness)
- Vinyl or paint for decoration
Free Drawings, Plans, and Tips From 40 Years of Experience
Proven Designs You Can Trust
Over the past 40 years, I’ve built dozens of arcade cabinets. As many people ask me, I decided to put together this collection, easy-to-follow Arcade Cabinet DIY plans that include:
- Panels dimensions
- Button layouts(this is something you can find here.
- Step-by-step assembly instructions
Tips & Tricks for a Smoother Build of the arcade cabinet DIY
- Pre-cut your wood at a local hardware store to save time
- Dry-fit all pieces before gluing or screwing
- Use hinges on the back panel for easy access to electronics
- When you do the connections to the buttons and joysticks abel all wiring for easier troubleshooting later
Install LED lights for that authentic arcade glow.
The End Result: Endless Hours of Retro Fun
Building your own Arcade Cabinet DIY is more than just a weekend project — I dare to name it a lasting investment in entertainment.
Once completed, your custom cabinet will offer hundreds (or thousands) of classic games, becoming a centerpiece of fun for family and friends.
Final Thoughts: You Can Do This
With a bit of time, patience, and the right guidance, anyone with basic DIY skills can complete an Arcade Cabinet DIY build. Whether it’s your first time or your fifth, the satisfaction of powering on your own handmade machine is unmatched.
So grab your tools, bring your kid along for the ride, and let the fun begin!